Monday, March 1, 2010

Birthday Banners

I originally got this idea from Rachael who bought a banner for her daughter's first birthday. You can find banners that look pretty much just like the one I made on Esty! I seriously considered buying one but they cost around $20 each and who wants to spend that kind of money on some paper on a string? I saw on Kelly Brown's blog that she made her own for her daughters birthday and I figured if she can do it then so can I!
While Robyn was a HUGE help with this project I can still walk you through how to make it! You can click on the picture above to make it bigger so you can copy what I did if you want to! I used plain colored card stock paper for the backs of each square and cut them 1 inch bigger on each side than I cut the patterned paper. I actually already had ALL the paper at home left over from my scrapbooking days buy you can find paper pretty cheap at places like Hobby Lobby.

I taped the patterned paper to the plain paper with photo stickers as I think they are SO much easier to work with than glue! I also bought chipboard letters from Hobby Lobby and used the photo stickers to stick them to the patterned paper. I had to buy three boxes of letters in order to get enough of each letter for the banners and I got them on sale 40% off each (sign up for Hobby Lobby emails and they email you a weekly coupon!) and I think they were originally $5.99 per box. Some of the letters had sticky on the back but they still needed to be re-inforced with the tape!

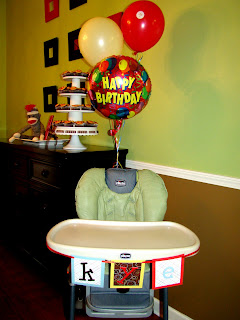
For the ribbon I used the thinnest ribbon I could find and bought it in plain red. I used a cute little hole punch and punched it at each corner then just put the ribbon through and bam! I was done! It's such an easy project that I will probably be making one EVERY year for each child's party (or at least saving the ones I make to see if they fit for a theme later down the road). Here is a picture of the one of Kye's name and I just taped it to his high chair tray!
If you don't use ANY of my other party ideas for your next party, this is the one I'd "steal" if I were you! It was just SO easy and looked SO good!!! 

Banana Favors

When you have a monkey themed birthday party you HAVE to have bananas! I thought they would make cute, fun, simple party favors and I was right! I think it was one of the things people will remember most about the party and I love that adults and children alike could enjoy them!

I had a basket sitting around my house that I used to keep them in and I tied random little ribbons all over it so it'd match the rest of the party. I bought the bananas the day before and used string to tie on the little cards. I ordered them from Etsy (Chickabug was the seller and she was GREAT). I spent $15 total on them as they were $5 per sheet and each sheet came with 8. I know that's a little expensive but it was a super cute personal touch and I love that they were made custom for his party! They read "Thanks for swinging by for my 1st Birthday! Love, Kye"


Party Hats and Noise Makers

It took me FOREVER to be able to find simple, PLAIN party stuff. Everywhere I looked everything had a ton of ugly designs on it and I really just wanted everything to match and have a simple, home-made look to it. I finally found some GREAT stuff at Pretty Party Place. For the noise makers I only paid $4 for 16 of them! For the party hats I paid $6 for 24. Great deal huh?
To add a little something personal to the noisemakers I hot glued ribbon around them. I think Zach thought I was a little nuts for doing this! At first I was going to just tie the ribbon but it didn't look as neat as I wanted so I whipped out the hot glue gun and went to town. It took only about 15 minutes and I think it was well worth it!

Originally I was planning on making super cute birthday hats by gluing ribbon and pom-poms around them. I wanted to make three special ones (one for Kye, one for Zach, and one for myself) and then just stick stickers on all the rest of them. Then I noticed that the hats had a slit up the back and a little hole on the top so I simply tied a knot in the bottom of little pieces of ribbon and strung it through! I used three pieces per hat and just let them hang there. They turned out so so great! I ended up making 15 of them and didn't bother to do any "special" ones because I liked these so much! And you can buy ones that look like this on Etsy for $5 or $6 PER hat! Think how much I could make if I sold these (I won't be doing that but still!).
The stickers read "Happy 1st Birthday Kye" and I used them on all of the hats as well as on the party balloons. I order them for $4 a sheet (25 per sheet) from Etsy. Special thanks to Chickabug who was SO sweet and helpful with everything! I realize now that I should have just ordered ONE sheet as I had a LOT left over! I have the extras to Mom to use to pass out at her class!

Monday, February 22, 2010

Upromise Savings

I'm sure everyone has heard of Upromise before and how they offer savings for college for your every day purchases. I started a UPromise account in high school and didn't really do much with it. I registered all my credit cards on their site (and my dad's too haha) and kinda forgot about it. Then Zach and I moved into our new home in 2008 and were trying to come up with ANY extra money we could to be able to buy furniture and I remembered my UPromise account. I checked it out and had about $250 in it! I know, that's not a TON of money but it was FREE MONEY that I earned by just using my registered credit cards! I cashed it in and they sent me a check for the full amount in my account!

They advertise UPromise as a college savings and it can be, but it can also just be a general savings account and you can cash in the money at any time. We recently started shopping at Publix so I got a UPromise card from them (you can ask at the check out line) and registered it on my account. Now every time we shop and scan the card we rack up some money in our UPromise savings! I'm hoping we can use it for Kye in the future but it's nice to have just in case something comes up where we need it. Sure it's not much (like we save $0.26 or something when we shop) but every little bit helps and over the years it'll add up to be a decent bit of money. Since I gutted the account in 2008 I've already earned back $87!

I also downloaded a reminder tool from their site that alerts me anytime I'm shopping on a website that would allow me to earn UPromise savings. I click "get my savings" and BAM! I automatically earn a little money from each purchase I make. MOST sites I shop from participate and some, like Vistaprint, actually give me BIGGER discounts by being a UPromise member! I know I could take advantage of a lot more savings offered on the site and I need to take the time to look through everything.

I highly recommend creating your free UPromise account today! Even if you don't need a college savings fund, why not earn a little extra dough on purchases you're already making?

I LOVE Vistaprint!

I had to write a little shout out to Vistaprint. I have been using them for YEARS and have never been disappointed. You can find just about anything on their site and everything is much better quality than you'd expect for the price. I've ordered Christmas cards, shower invitations, our RSVP cards for our wedding, photo calendars for Christmas gifts, photo mouse pads for Christmas gifts, and now birthday invitations!

You can choose from any of their designs and edit them however you want. You can also upload pictures and add them to anything you want as well! They ALWAYS have stuff on sale and whenever you place an order they send you a coupon for 25% off your next purchase.

The only downside? The shipping takes a LONG time. Like 20 days if you do their cheapest method. Since I'm a planner this isn't typically a problem and when it is I call them directly and they have ALWAYS given me a free upgrade shipping. When I ordered the mouse pads at Christmas one of them had an issue (Kye looked like he had devil eyes in one of the pictures). I called them and they let me keep the original mouse pad, credited my account for the cost of the mouse pad, AND sent me a new one that got to me in 2 days time! I was SO impressed with them and will be continuing to use them in the future!

If you are a UPROMISE member, you get additional discounts through their site! I'd love to hear how you like Vistaprint and where you get your invitations and such from!

Saturday, February 20, 2010

Pampered Chef Bread Tube

An old friend had one of these and would make this bread spread ALL the time and now it's one of our family favorites too!

First, you need the bread tube itself. These are AWESOME. My friend had the flowered one so I first bought that one but for Valentine's Day I invested in the heart shaped one too. AND I've just ordered the star shaped one and hope it comes in time to use for Kye's 1st Birthday Party!

You can find the tubes on Ebay for VERY low prices (I only paid $3 for the star one). You can click on the link to automatically see results for the search!
For the bread spread I make all you need is:
Pillsbury Italian or French bread loaf (in the dough tube like crescent rolls)
Ranch Packets
Whipped Cream Cheese

I use one packet for a little less than 8 oz of cream cheese but you can just slowly mix the two together and get the consistency you like. My friend who made them first put little cucumbers on top but I don't know anyone who really likes those so I just don't include them. When finished it makes an adorable and YUMMY treat!
 
I'm so excited to use my heart one for Valentine's Day next year. The tubes come with instructions on how to make the bread and the heart one I got had some other ideas in it too. Next year I plan to make the bread and use it for little sandwiches for lunch then the bread spread at dinner. I also plan to make rice krispie treats inside of it AND ice cream! All you do for the ice cream is fill it with ice cream then stick it in the freezer for awhile and you'll have heart shaped ice cream! How fun is that?!?

Everyone that's ever seen me make this bread has complimented on how cute it is and how amazing it tastes. So many people have mentioned buying one and I totally recommend it! I'd love to hear your thoughts on them or any neat ideas you may have to use them for!!! 

Roasted "Pork" Tenderloin

This is one of our family favorites and is VERY easy!

Since Zach and I do Weight Watchers I've converted it a little bit to make it less points and it's still FABULOUS!

Roast "Pork" Tenderloin Supper

2 pork tenderloins (I used Jennie-O Turkey Tenderloins instead to make the meal lower points and one package had 2 in it)
1/4 cup dijon mustard
2 tsp dried thyme leaves
1/2 cup chicken broth
4 oz of cream cheese or neufchantal cheese (I used fat free cream cheese)

1. Preheat oven to 400 degrees
2. heat large skillet on medium heat then add pork and cook 5 min or until browned on all sides
3. remove meat from skillet and place in 9x13 baking dish
4. combine mustard and thyme and spread evenly onto meat
5. bake 20-25 min then transfer to a cutting board and tent with fork (I have NO clue what tenting means so I just sat it on the cutting board?) and let stand for 5 min.
6. meanwhile add broth to skillet and bring to a boil on high setting
7. reduce to medium-low and add cheese cooking 2 min or until well blended, stirring constantly
8. cut meat into thin slices

I put the broth/cheese mix into little condiment serving dishes and use it as a dip for the meat. It's super yummy and if you use the Jenni-O turkey substitute then it makes:

8 SERVINGS at 2 WW POINTS PER SERVING (including the meat dip!)
 
 If anyone tries it let me know what you think! Even Kye enjoyed it for our Valentine's Day Feast!