While Robyn was a HUGE help with this project I can still walk you through how to make it! You can click on the picture above to make it bigger so you can copy what I did if you want to! I used plain colored card stock paper for the backs of each square and cut them 1 inch bigger on each side than I cut the patterned paper. I actually already had ALL the paper at home left over from my scrapbooking days buy you can find paper pretty cheap at places like Hobby Lobby.
I taped the patterned paper to the plain paper with photo stickers as I think they are SO much easier to work with than glue! I also bought chipboard letters from Hobby Lobby and used the photo stickers to stick them to the patterned paper. I had to buy three boxes of letters in order to get enough of each letter for the banners and I got them on sale 40% off each (sign up for Hobby Lobby emails and they email you a weekly coupon!) and I think they were originally $5.99 per box. Some of the letters had sticky on the back but they still needed to be re-inforced with the tape!
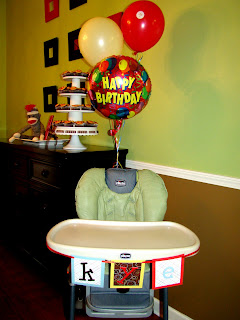
For the ribbon I used the thinnest ribbon I could find and bought it in plain red. I used a cute little hole punch and punched it at each corner then just put the ribbon through and bam! I was done! It's such an easy project that I will probably be making one EVERY year for each child's party (or at least saving the ones I make to see if they fit for a theme later down the road). Here is a picture of the one of Kye's name and I just taped it to his high chair tray!
If you don't use ANY of my other party ideas for your next party, this is the one I'd "steal" if I were you! It was just SO easy and looked SO good!!!


Wowo=! looked like a fun party! you are so creative
ReplyDeletei stole your idea and made a banner for a baby shower im hosting and it turned out SO cute!! i love it! thanks for the idea!
ReplyDelete