Showing posts with label birthday party. Show all posts

Wednesday, September 23, 2015

Macaroni and Cheese Bites

An awesome recipe perfect to make ahead and serve at your next gathering!

Ingredients:

  • ½ lb macaroni pasta
  • 1 ½ tbsp butter
  • 1/4 cup grated parmesan cheese
  • 2 tbsp flour
  • 3/4 cup milk
  • 1 cup shredded cheddar cheese
  • 1 cup sliced american cheese, chopped
  • 1 egg yolk
  • 1/4 tsp paprika
  • bacon pieces if desired


Directions:

  1. Preheat oven to 425 (if you don't plan to make in advance)
  2. Boil salted water in a large pot then cook macaroni about 5 min then drain
  3. Spray muffin tins with non stick spray then sprinkle with parmesan cheese on bottom (I also sprinkled bacon bits on the bottom of mine with the cheese)
  4. In a large saucepan, melt butter then whisk in flour over medium heat for 2 minutes
  5. Whisk in milk and whisk constantly until boiling (roughly 5 minutes)
  6. Add in cheddar and american cheeses and whisk until melted
  7. Remove saucepan from heat and which in egg yolk and paprika then fold in drained macaroni
  8. Spoon macaroni mix into muffin cups
  9. At this point you can cover and refrigerate the day prior to your event
  10. Once ready to bake sprinkle the tops with parmesan then bake about 10 minutes (slightly longer if straight from fridge). Let cool 5 min and remove from pan!
I also froze some of these leftover and have reheated them for school lunches and they do great! Big hit!!!


Crock Pot Spinach and Artichoke Dip

Crock pot meals are my JAM and being able to use it for party food? Even better! We LOVE this new recipe and it's become a family favorite...even if there isn't a party going on ;)

Ingredients:

  • 2 (14 oz) cans artichoke hearts, drained and chopped
  • 1 (10 oz) package frozen spinach, thawed and squeezed dry
  • 8 oz sour cream
  • 2 cloves garlic, crushed
  • 3/4 cup grated parmesan cheese
  • 3/4 cup milk
  • ½ cup crumbled feta cheese (this ingredient MAKES IT! YUM for FETA!)
  • 1/3 cup mayo
  • 1 tablespoon red wine vinegar
  • 1/4 teaspoon black pepper
  • 8 oz cream cheese cut into cubes


Directions

  1. Put everything in crockpot except for cream cheese and stir until well combined.
  2. Top with the cream cheese cubes
  3. Cover and cook on low for 2 hours
  4. Uncover and then stir until cream cheese is well mixed in
  5. Cover and cook on high for an additional 15 minutes

Is even excellent cold leftover!

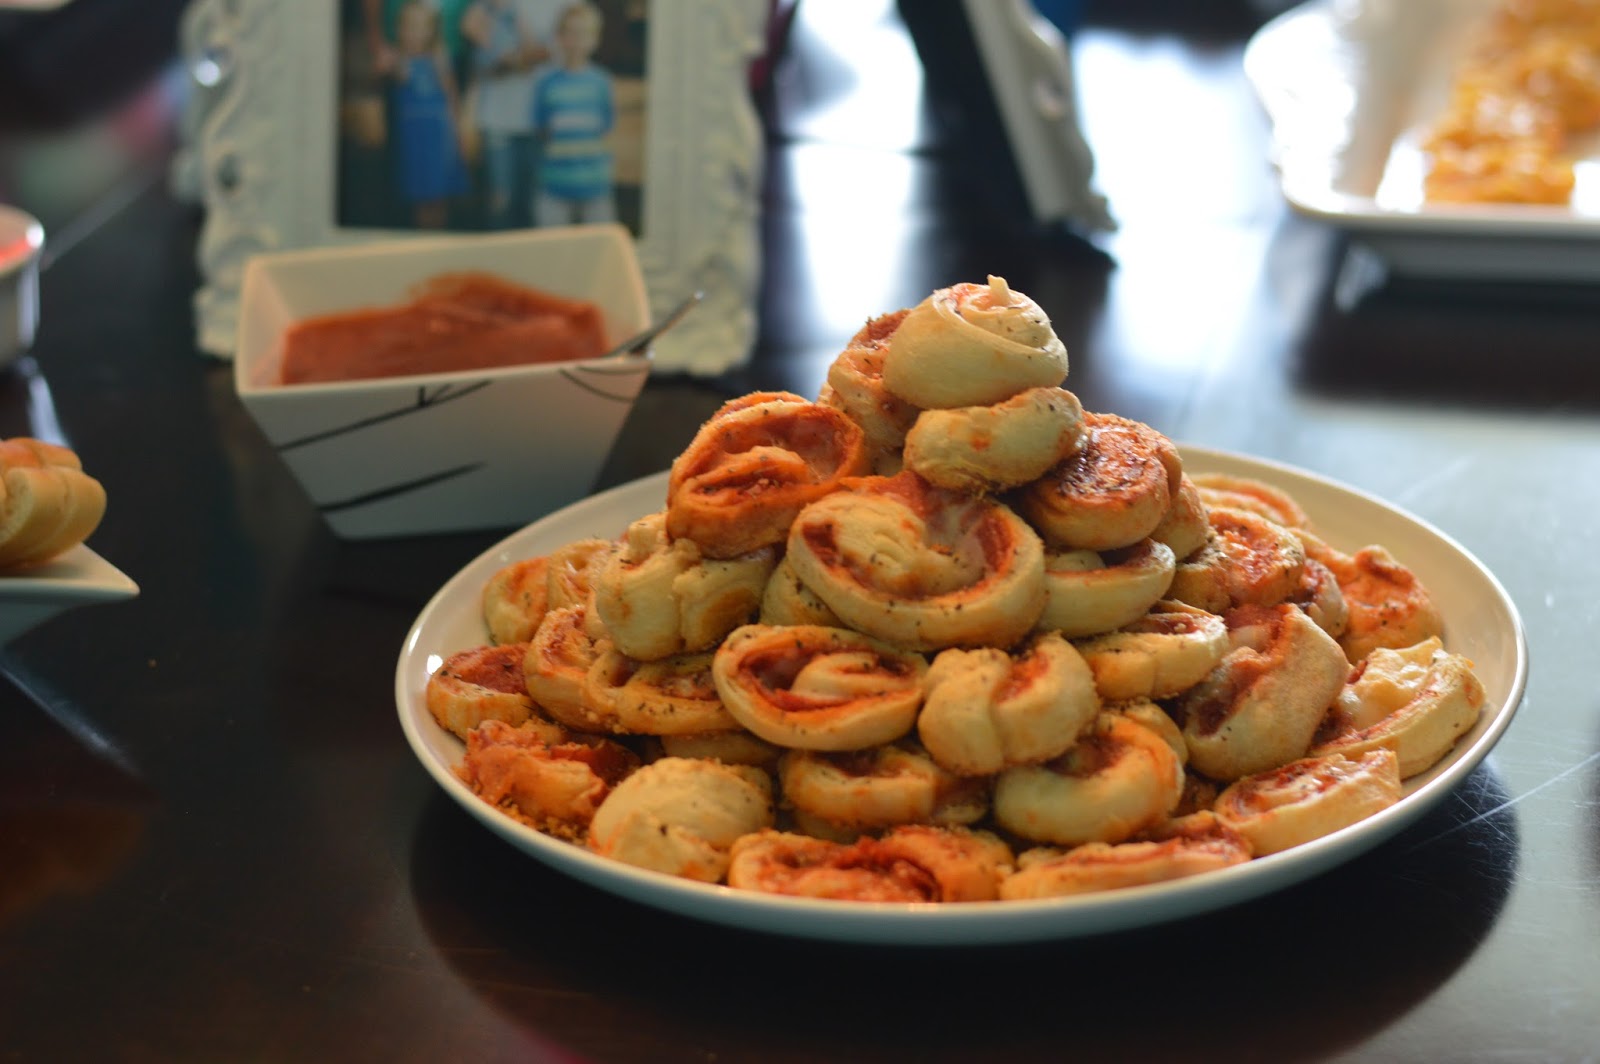
Pinwheel Pizzas

An easy party food to make in advance! Keep your party day prep to a minimum and still wow 'em! (this is double the original recipe as these are so good you'll want plenty!)

Ingredients

  • 2 cans crescent roll dough
All other ingredients are not exact, you can eye ball the amounts and easily trade things out to make your own original combinations!
  • 4 cups shredded mozzarella cheese
  • 48 slices pepperoni, cut into quarters
  • 2 cans pizza sauce (28 oz)
  • 2 teaspoon italian seasoning


Directions
  1. On a large baking sheet pinch together 8 crescent roll triangles into 4 separate rectangles. Gently stretch out the dough a little bit
  2. Spread desired amount of pizza sauce over the dough followed by mozzarella and pepperonis
  3. DO NOT overload it! I made the mistake of putting too many toppings on and then not being able to roll it ;) 
  4. Once each rectangle has the toppings, start at the long end of each dough and roll tightly in a log. Repeat with each rectangle.
  5. Place in freezer until firm, about 15 min. 
  6. Remove from freezer and cut each log into 6-8 pieces. Sprinkle with italian seasoning.
  7. At this point if you are making them in advance you can freeze them! I made mine a few days prior to my party and froze them and they were fabulous :)
  8. When ready to cook preheat oven to 375
  9. Bake until golden brown (roughly 12 min, maybe longer if straight from freezer). Serve with remaining pizza sauce for dipping! 


Thursday, June 14, 2012

Orange Party Punch

Finding a YUMMY punch is so important for any party! I like to have my punch match my color scheme so I recently needed to find an orange punch. I found this recipe from Taste of Home and it was super tasty so I thought I'd share!

Ingredients:
  • 1 can (12 oz) frozen orange juice concentrate, thawed
  • 2 liters lemon-lime soda, chilled
  • 1 can (46 oz) pineapple juice, chilled (they were out of the can at Publix so I bought a big bottle of it and guesstimated how much to use)
  • 1 quart orange or pineapple sherbert (I used orange to match my color scheme)
Directions:
  1. Prepare orange juice according to package directions; pour into a punch bowl.
  2. Stir in soda and pineapple juice
  3. Top with scoops of sherbet (we didn't worry with making them pretty scoops as you can tell haha)
  4. Serve immediately
 

Breakfast Casserole Muffins

These are PERFECT for a breakfast/brunch event. They were THE HIT of the baby shower and everyone asked for the recipe! You could easily freeze them as well to warm up for breakfasts! Original recipe was found on CDKitchen.

Ingredients:
  • 1 pound sausage, browned and drained
  • 6 eggs
  • 1 cup Bisquick baking mix
  • 2 cups half and half
  • 1/2 teaspoon salt
  • 1/4 teaspoon black pepper
  • 2 cups grated cheese (I didn't use grated...instead I used shredded cheddar cheese)
Directions:
  1. Lightly grease muffin tins then place drained sausage in them.
  2. Mix eggs, bisquick, half-and-half, and salt and pepper together
  3. Pour evenly over sausage
  4. Top with grated cheese (I used shredded cheddar and just put a BUNCH of it on them, you can never have too much cheese right?!?!)
  5. Bake for 25 minutes at 350 degrees

Wednesday, March 21, 2012

Birthday Banner

I am not very good at crafts but I refuse to pay a bunch of money on Etsy for someone to make something that I can totally make myself. I've figured out a simple way to make a cute birthday banner and I use this same technique for all the banners I make (great for parties, showers, etc!). It's SO easy and they always get lots and lots of compliments! Here's how I do it!

Supplies: I'm a big fan of over-buying. I buy WAY more than I need for a project so that way I don't stress if I mess up and then I just return all the left over stuff I don't use.
  • 12x12 sized patterned paper (I buy one piece per letter that I plan to do)
  • 8 1/2 x 11 sized plain paper (Again, I buy one piece per letter)
  • Photo stickers
  • Chipboard letters (I get ALL my supplies at Hobby Lobby, these are kinda pricey but often go on sale and you can get 40% off coupons all the time online. The packages come with two of each vowel but one of every other letter so, for me, I have to buy THREE packages in order to spell out "Happy Birthday Kye" because all those dang y's!)
  • Paper cutter. I have one from my scrapbooking days. Make sure it has a good ruler on it too, makes life easier!
  • Hole punch
  • String or ribbons or twine
  • Hole protectors (optional)
Instructions:
  1. Cut the patterned 12x12 paper into 6x6 squares (so yes, you can get two squares out of each sheet)
  2. Cut the solid 8 1/2 x 11 paper into 4x4 squares (so you should be able to get four squares out of each sheet)
  3. Cut the pieces of photo stickers to fit on the chipboard letters and place in center of each solid square
  4. Place photo stickers on back of solid square and stick on center of patterned square.
  5. Punch holes in the top corners or along the center edges (but not too close to the edge or they will rip) of each patterned square. When I made this one I had an after thought that it'd be SUPER smart to use hole protectors on the backs (those little stickers with holes in them) of the patterned squares to protect the holes from ripping. I'll probably do that next time!
  6. Thread the string or ribbon through the holes, leaving extra space to be able to separate the letters. I have also made these where I tie a ribbon from one to the next instead of having them all on one long string. It just depends on the look you're trying to achieve. For this one I wanted a western type look so I used some string I had a roughed it up a little bit. I also put it through the top of the patterned squares so you could see it and it added to the look.
Finished product (you can click to make pictures larger)


Monday, December 5, 2011

Toilet Paper Roll Favors

I found the instructions for these cute favors on Pinterest (from this site). I'm using them as a way to pretty much butter up the hospital staff when I go into labor, but they'd be great party favors too! I contacted my FAVORITE Etsy seller, Chickabug, and she came up with the little labels for me. I'm not very good with wording and she ROCKS. Plus, aren't they super cute?!?!

Here's how to make these favors yourself!

What You Need:

toilet paper rolls (I ended up making 32 total...Zach jokes that I'm giving them out to the entire hospital but I just wanted to have PLENTY!)
12x12 scrapbook paper (you can cover 4 rolls per sheet)
Mod Podge
Paint brush for Mod Podge
Ribbon
Labels (I ordered the PDF from Chickabug then cut them out using a 2" circle cutter)
Treats (I used M&Ms)
Scissors

What To Do:
  1. Cut out all labels
  2. Fold paper in 4ths then cut out the squares. I then put one roll on one of the squares and cut it narrow enough to fit the roll. I used that piece of paper as a guide to cut all the other papers.
  3. Cover roll in Mod Podge
  4. Roll paper around toilet paper roll. I put extra Mod Podge over the seal to keep the paper on the roll
  5. Fold down ends on one end of roll then pour in candy and fold down the opened end
  6. Wrap ribbon around roll and cut. Then I wrapped it where the ribbon came together in the front of the roll so the seal of the roll was covered by ribbon in the back. I put Mod Podge where the ribbon came together in the front and held it in place for a few seconds.
  7. Put more Mod Podge on top of spot where ribbon came together as well as on the back of the label. Then put label on top of ribbon and hold.
  8. The instructions on the blog I found said to cover the label in Mod Podge as well...and I tried that but it smeared my labels so I just held it down for awhile and it worked fine!
It was VERY inexpensive and VERY easy. Although, it was time consuming. I didn't mind it taking the time since I am doing nothing but waiting on a baby anyway ;) But for a party favor it may be a little bit tedious! I think they turned out cute though and can't wait to be handing them out at the hospital!

Monday, March 28, 2011

Chocolate Golf Ball Favors

In searching for golf themed items I stumbled across this site (www.countrykitchen.com) that has a TON of great ideas and all the supplies you need to make those ideas a reality! I loved the idea of these chocolate golf balls for favors for the party. I've never made any chocolate goodies myself but thought I'd give it a try!


To make the golf balls I ordered all the supplies listed on the site (super white coating-merckens, squeeze bottle, two golf ball candy molds, and 30 truffle boxes). To make them I:

1. melted the chocolate (a 1 lb bag was enough chocolate to fill ONE candy mold tray...so it made 1/2 of 8 balls)
2. poured the chocolate into the mold. At first I tried to pour the chocolate into the squeeze bottle then squeeze it from that into the mold but what a joke! It's MUCH easier to melt the chocolate in a large class measuring cup and just pour directly from there. It's also important to make sure no chocolate gets outside the edges of each ball mold or it'll be stuck there and it's a pain to scrape it off later
3. put the mold in the freezer. I waited over night but you can probably just wait a couple hours-they freeze pretty quick
4. to make the other side of the ball you first remove the now frozen halves from the molds (CAREFULLY they break pretty easy). Then melt chocolate again and refill the molds. CAREFULLY (lots of things to be careful about with this project) place the already frozen halves on top of the melted chocolate halves and place back in freezer. You want to make sure a bunch of chocolate doesn't overflow all over the trays or you have a mess and a not-so-ball-looking-ball once it freezes. But at the same time you want to make sure there is ENOUGH chocolate for the pre-made half to cling to or you'll have holes in your ball!
5. Once frozen they are done! Mine never looked as good as the one pictured but they were cute enough for favors for the party. They were more expensive and time consuming than I planned so I'm not sure I'll do them again...but if I do I probably will not be doing a 3D thing like this as I think that made it even more complicated and tough!

I topped the truffle boxes with custom stickers I had made at Chickabug on Etsy!
They turned out cute and were a big hit for sure!

Chocolate Covered Donut Holes

As you know I got a lot of my inspiration for Kye's golf party from How Does She? and these were one of my favorite ideas! They made adorable "golf balls" but the idea could EASILY be translated to other party themes!

Here's how to do them for your next party:

1. We bought 4 dozen donut holes the morning of the party. Next time we'll buy them the night before. I actually think the freshness of the donut holes made 'em tougher to work with b/c they were SO soft!
2. Mom helped out by melting white chocolate (you can buy BIG blocks of it at Walmart for much cheaper than the little white chips I used for the favors) in a double broiler on the oven
3. We dipped the balls in the chocolate, covered them in white ball sprinkles, then set them on wax paper to dry
4. When almost dry we put them on white sticks!
5. We used green foam stuff used for flower arrangements as the base. I put that on a regular old cookie sheet then we stuck all the sticks in it and covered in green shredded paper. (I bought both the flower arrangement pieces and green paper shreds at Hobby Lobby for half off!).

These were SO SO SO YUMMY. Like seriously DELICIOUS! I will be making them at many more events in the future. They are easy, adorable, and super good. They were a HIT for the party! I do think next time they will look more "ball like" by buying the donut holes in advance because they were just so FRESH that they melted right along with the chocolate ;)

Golf Ball Cupcakes

When looking at the golf party on How Does She? I thought the cupcakes she made were adorable but my first thought was green food coloring on my carpet. Um no thanks! Instead I got creative and ordered some supplies from Country Kitchen. I ordered brown cupcake liners, green long sprinkles (called jimmies...who knew?!?!) and the white golf ball toppers. 

All I did to make them was use a simple chocolate boxed cake mix then frost them with vanilla frosting and dip into the sprinkles (a 1 lb bag of sprinkles had MORE than enough for 48 cupcakes). If you have cupcakes for an event I highly recommend making them the night before. I invested in a nice cupcake holder/carrier (I have this one from Crate and Barrel actually) and I put all the cupcakes in there after I make them (I need to get another one because I have to store the extra 24 cupcakes in random tupperware!). It makes them SO moist and ultra yummy for the event! 

I think these turned out super cute and were VERY simple to make!

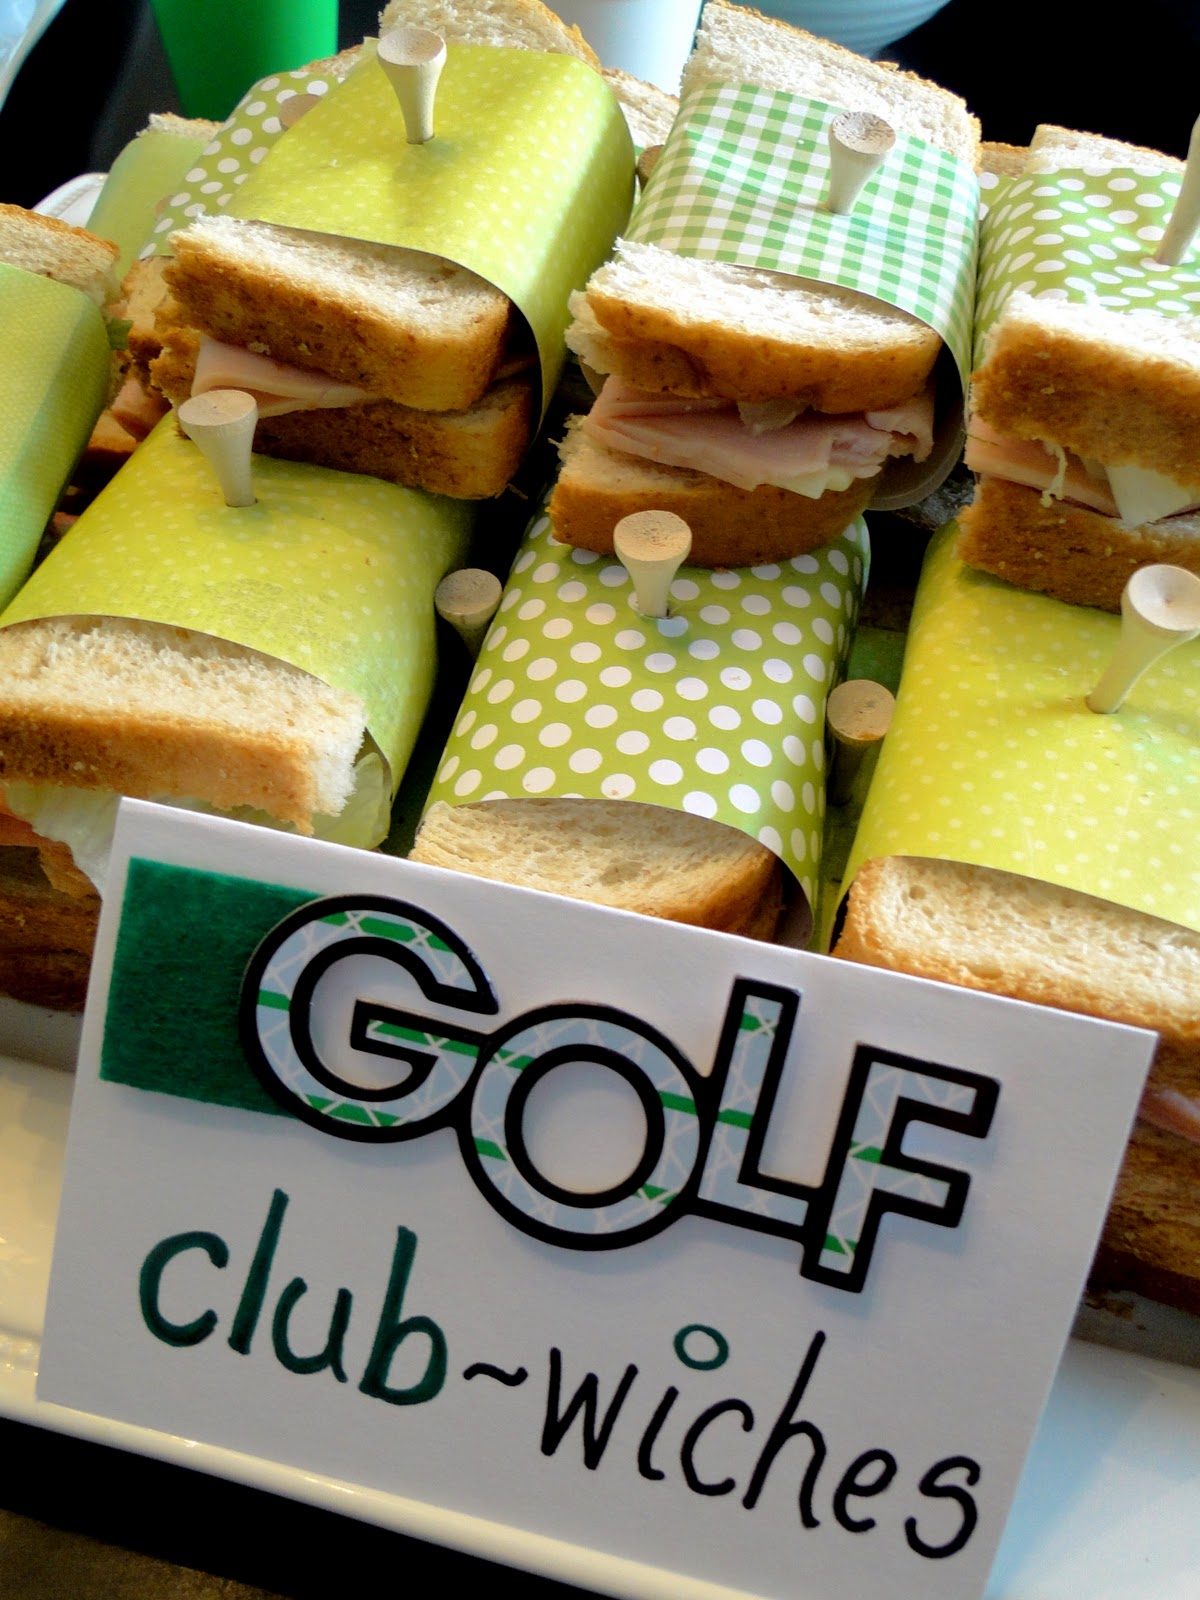
Decorative Sandwiches

Of course I got this idea from How Does She? and it's something that I will be using again and AGAIN in the future. It can work for ANY theme and it's cheap and easy (which are my two requirements of crafty diy type things!). 

1. I bought scrapbook size paper (12x12) and we cut them into strips.
2. We made the sandwiches (wheat bread, some with turkey, some with ham, american cheese, and lettuce!) and tried to keep them as neatly contained within the bread as possible. Then we simply wrapped the paper around each half
3. We stuck a custom golf tee (thanks to MidTownTees on Etsy) through each one and they looked ADORABLE!!! 

You could mix it up for a different theme with different paper and something else for the "tee" part. Or even just get colored tees to match your theme as they are not expensive at all (plus we kept all the tees people left and Zach will use them on his golf outings)

Monday, March 1, 2010

Green "Jungle" Punch

I found this recipe on Cooks and I didn't even test it before I used it for the party! After the party started and people kept telling me how good it was I tried some and yup, it's a winner for sure! And it fits my requirements of being easy and cheap :) It was actually the ONLY thing we "ran out of" during the party and we had to make another batch!
You need:
2 liters ginger ale (when I went to Publix all they had was Diet but it worked and no one noticed!)
1 large container of frozen lemonade
1 large can of pineapple juice chilled (I kept it in my fridge until the day of the party)
1 qt lime sherbet

Obviously I doubled this recipe and I was thankful I did as it ALL got gobbled up! I didn't make the punch until about 10 minutes prior to the party and all I did was dump all the ingredients in the punch bowl and stir it up! Enjoy :)

Jungle Vine

My mom is an elementary school teacher which can be pretty handy when I need creative help! When we decided to do the monkey theme she came up with the idea to make a vine to hang in the house as part of the decorations.
 
If you haven't noticed a theme to my party decorations yet, here it is: CHEAP and EASY! haha! We used brown paper bags (Publix will give them to you for free!). We cut the bags to make them open and long then rolled them up and twisted them to make them vine-like. We attached them together with stables. Then I bought bendable ivy from Hobby Lobby (which was kinda expensive, they were 1/2 off but were still $6 each and I bought two) and we cut it up and wrapped it around random sections. Zach (being 6'5" is so helpful at times!) attached them to the wall in the dining room them wrapped them around the chandelier. They looked better than I pictured in my head and we added a blow up monkey Seth and Crissy let us borrow to hang down from his home!


Monkey Cupcakes

I opted to do cupcakes for Kye's party because I didn't want to hassle with cutting a cake (I'm awful at it) or worrying with buying silverware. Cupcakes are cute, cheap, easy, and everyone likes them! I hunted online for a monkey type design that wouldn't require a bunch of different ingredients or time. I found the one I used from some RANDOM site and I think they turned out great!
 
I used a box of chocolate cake (I think it's was actually Devil's Food Cake) and milk chocolate frosting (I read that it's better to use the milk chocolate kind b/c it's lighter in color). Then I bought mini-vanilla waffers and Zach cut them in half for me to use for the ears. I used 3/4 of the original sized vanilla waffers for the face. Then all I did was buy black frosting gel and red frosting gel for the eyes, nostrils, and mouth! Very simple and cute! As they sat the waffers actually got soft which people told me made them even better :) 

Birthday Banners

I originally got this idea from Rachael who bought a banner for her daughter's first birthday. You can find banners that look pretty much just like the one I made on Esty! I seriously considered buying one but they cost around $20 each and who wants to spend that kind of money on some paper on a string? I saw on Kelly Brown's blog that she made her own for her daughters birthday and I figured if she can do it then so can I!
While Robyn was a HUGE help with this project I can still walk you through how to make it! You can click on the picture above to make it bigger so you can copy what I did if you want to! I used plain colored card stock paper for the backs of each square and cut them 1 inch bigger on each side than I cut the patterned paper. I actually already had ALL the paper at home left over from my scrapbooking days buy you can find paper pretty cheap at places like Hobby Lobby.

I taped the patterned paper to the plain paper with photo stickers as I think they are SO much easier to work with than glue! I also bought chipboard letters from Hobby Lobby and used the photo stickers to stick them to the patterned paper. I had to buy three boxes of letters in order to get enough of each letter for the banners and I got them on sale 40% off each (sign up for Hobby Lobby emails and they email you a weekly coupon!) and I think they were originally $5.99 per box. Some of the letters had sticky on the back but they still needed to be re-inforced with the tape!

For the ribbon I used the thinnest ribbon I could find and bought it in plain red. I used a cute little hole punch and punched it at each corner then just put the ribbon through and bam! I was done! It's such an easy project that I will probably be making one EVERY year for each child's party (or at least saving the ones I make to see if they fit for a theme later down the road). Here is a picture of the one of Kye's name and I just taped it to his high chair tray!
If you don't use ANY of my other party ideas for your next party, this is the one I'd "steal" if I were you! It was just SO easy and looked SO good!!! 

Banana Favors

When you have a monkey themed birthday party you HAVE to have bananas! I thought they would make cute, fun, simple party favors and I was right! I think it was one of the things people will remember most about the party and I love that adults and children alike could enjoy them!

I had a basket sitting around my house that I used to keep them in and I tied random little ribbons all over it so it'd match the rest of the party. I bought the bananas the day before and used string to tie on the little cards. I ordered them from Etsy (Chickabug was the seller and she was GREAT). I spent $15 total on them as they were $5 per sheet and each sheet came with 8. I know that's a little expensive but it was a super cute personal touch and I love that they were made custom for his party! They read "Thanks for swinging by for my 1st Birthday! Love, Kye"


Party Hats and Noise Makers

It took me FOREVER to be able to find simple, PLAIN party stuff. Everywhere I looked everything had a ton of ugly designs on it and I really just wanted everything to match and have a simple, home-made look to it. I finally found some GREAT stuff at Pretty Party Place. For the noise makers I only paid $4 for 16 of them! For the party hats I paid $6 for 24. Great deal huh?
To add a little something personal to the noisemakers I hot glued ribbon around them. I think Zach thought I was a little nuts for doing this! At first I was going to just tie the ribbon but it didn't look as neat as I wanted so I whipped out the hot glue gun and went to town. It took only about 15 minutes and I think it was well worth it!

Originally I was planning on making super cute birthday hats by gluing ribbon and pom-poms around them. I wanted to make three special ones (one for Kye, one for Zach, and one for myself) and then just stick stickers on all the rest of them. Then I noticed that the hats had a slit up the back and a little hole on the top so I simply tied a knot in the bottom of little pieces of ribbon and strung it through! I used three pieces per hat and just let them hang there. They turned out so so great! I ended up making 15 of them and didn't bother to do any "special" ones because I liked these so much! And you can buy ones that look like this on Etsy for $5 or $6 PER hat! Think how much I could make if I sold these (I won't be doing that but still!).
The stickers read "Happy 1st Birthday Kye" and I used them on all of the hats as well as on the party balloons. I order them for $4 a sheet (25 per sheet) from Etsy. Special thanks to Chickabug who was SO sweet and helpful with everything! I realize now that I should have just ordered ONE sheet as I had a LOT left over! I have the extras to Mom to use to pass out at her class!