Saturday, March 13, 2010

Mr. Monkey - Lovie

As you may have noticed on my personal blog, I love Kye's Mr. Monkey! He sleeps with him every nap and at night and I'm so thankful we have him! I think he'll be a big help with weaning off the paci too :) I thought I'd share some info in case anyone wanted a Mr. Monkey of their own.

My mom actually bought Mr. Monkey for Kye for his first Easter. They make a smaller size (Kye has the big one) and they are great because they are machine washable! We actually bought a back-up one so that way when I do wash the "main" one he doesn't have to go without.
When he got the monkey I thought it was cute but I didn't want to put it in the crib with him due to SIDS risks. I actually decided to call the company about it. They were SUPER nice and explained to me that their "blankies" are the only ones that have been approved as safe at any age in a crib!!! The material is breathable and it's a good side to insure they won't somehow hurt themselves with it. It's been voted one of the 10 best toys by Dr. Toys and I agree with him, out of all the the baby junk I've fallen for and purchased this is one thing I'm so thankful we have!

Here is the site to order one for yourself...they are by Komet Creations. You can't actually order off the site but they have a link to find a retailer near you or you can google "komet creations lovie" and a bunch of online stores pop up! I actually decided to write this post because I googled "lovie" (Mr. Monkey's official name) and a MILLION things came up that weren't lovies and it took me awhile to find the actual site! They have tons of different types of animals and things too. I actually told Mrs. Charlotte about Kye's awhile back and now Payton, Kye's cousin, sleeps with a Hippo every night! had to share so other babies out there can enjoy their own "Mr. Monkey" too!

Tuesday, March 9, 2010

B. Toys

Before Kye's birthday I went to Target to make a wishlist for him and I saw these neat toys! They are by a company called B.toys (link is to their facebook fan page, their company site isn't up and running yet). I was drawn to them mainly because of the colors the company uses. Instead of the bright, primary colors of every toy on the market these are more modern looking with fun, funky colors and cool designs.
For Kye's birthday we got him three of their toys: Parum Pum Pum drum, Fish and Splish bath boat, and Times Square. B.toys is a new company and I love that on the facebook fan page they ask for fans input on things! It was neat to finally get to open the toys and check them out!!! My favorite is the drum...it is filled with musical instruments and they are REAL ones! The tub toy is really neat too, it was cheaper than the one we almost bought by Fisher Price and it came with a lot more fun toys! Our least favorite is the Times Square cube only because it didn't come with directions and took us a while to figure out how to open it as well as how to get the batteries in it. I plan on letting the company know about those issues as I'd hate for someone to get that as their first toy by the company then not like them because of those flaws! 

Not only do I like the look of the toys but I LOVE the prices! They were all under $20 each which for baby toys is pretty awesome! I highly recommend checking them out for yourself (I know they are available through target!)

Monday, March 1, 2010

Green "Jungle" Punch

I found this recipe on Cooks and I didn't even test it before I used it for the party! After the party started and people kept telling me how good it was I tried some and yup, it's a winner for sure! And it fits my requirements of being easy and cheap :) It was actually the ONLY thing we "ran out of" during the party and we had to make another batch!
You need:
2 liters ginger ale (when I went to Publix all they had was Diet but it worked and no one noticed!)
1 large container of frozen lemonade
1 large can of pineapple juice chilled (I kept it in my fridge until the day of the party)
1 qt lime sherbet

Obviously I doubled this recipe and I was thankful I did as it ALL got gobbled up! I didn't make the punch until about 10 minutes prior to the party and all I did was dump all the ingredients in the punch bowl and stir it up! Enjoy :)

Jungle Vine

My mom is an elementary school teacher which can be pretty handy when I need creative help! When we decided to do the monkey theme she came up with the idea to make a vine to hang in the house as part of the decorations.
 
If you haven't noticed a theme to my party decorations yet, here it is: CHEAP and EASY! haha! We used brown paper bags (Publix will give them to you for free!). We cut the bags to make them open and long then rolled them up and twisted them to make them vine-like. We attached them together with stables. Then I bought bendable ivy from Hobby Lobby (which was kinda expensive, they were 1/2 off but were still $6 each and I bought two) and we cut it up and wrapped it around random sections. Zach (being 6'5" is so helpful at times!) attached them to the wall in the dining room them wrapped them around the chandelier. They looked better than I pictured in my head and we added a blow up monkey Seth and Crissy let us borrow to hang down from his home!


Monkey Cupcakes

I opted to do cupcakes for Kye's party because I didn't want to hassle with cutting a cake (I'm awful at it) or worrying with buying silverware. Cupcakes are cute, cheap, easy, and everyone likes them! I hunted online for a monkey type design that wouldn't require a bunch of different ingredients or time. I found the one I used from some RANDOM site and I think they turned out great!
 
I used a box of chocolate cake (I think it's was actually Devil's Food Cake) and milk chocolate frosting (I read that it's better to use the milk chocolate kind b/c it's lighter in color). Then I bought mini-vanilla waffers and Zach cut them in half for me to use for the ears. I used 3/4 of the original sized vanilla waffers for the face. Then all I did was buy black frosting gel and red frosting gel for the eyes, nostrils, and mouth! Very simple and cute! As they sat the waffers actually got soft which people told me made them even better :) 

Birthday Banners

I originally got this idea from Rachael who bought a banner for her daughter's first birthday. You can find banners that look pretty much just like the one I made on Esty! I seriously considered buying one but they cost around $20 each and who wants to spend that kind of money on some paper on a string? I saw on Kelly Brown's blog that she made her own for her daughters birthday and I figured if she can do it then so can I!
While Robyn was a HUGE help with this project I can still walk you through how to make it! You can click on the picture above to make it bigger so you can copy what I did if you want to! I used plain colored card stock paper for the backs of each square and cut them 1 inch bigger on each side than I cut the patterned paper. I actually already had ALL the paper at home left over from my scrapbooking days buy you can find paper pretty cheap at places like Hobby Lobby.

I taped the patterned paper to the plain paper with photo stickers as I think they are SO much easier to work with than glue! I also bought chipboard letters from Hobby Lobby and used the photo stickers to stick them to the patterned paper. I had to buy three boxes of letters in order to get enough of each letter for the banners and I got them on sale 40% off each (sign up for Hobby Lobby emails and they email you a weekly coupon!) and I think they were originally $5.99 per box. Some of the letters had sticky on the back but they still needed to be re-inforced with the tape!

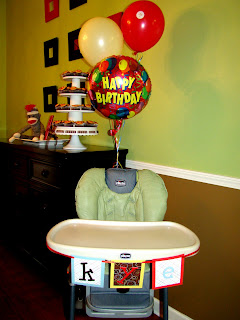
For the ribbon I used the thinnest ribbon I could find and bought it in plain red. I used a cute little hole punch and punched it at each corner then just put the ribbon through and bam! I was done! It's such an easy project that I will probably be making one EVERY year for each child's party (or at least saving the ones I make to see if they fit for a theme later down the road). Here is a picture of the one of Kye's name and I just taped it to his high chair tray!
If you don't use ANY of my other party ideas for your next party, this is the one I'd "steal" if I were you! It was just SO easy and looked SO good!!! 

Banana Favors

When you have a monkey themed birthday party you HAVE to have bananas! I thought they would make cute, fun, simple party favors and I was right! I think it was one of the things people will remember most about the party and I love that adults and children alike could enjoy them!

I had a basket sitting around my house that I used to keep them in and I tied random little ribbons all over it so it'd match the rest of the party. I bought the bananas the day before and used string to tie on the little cards. I ordered them from Etsy (Chickabug was the seller and she was GREAT). I spent $15 total on them as they were $5 per sheet and each sheet came with 8. I know that's a little expensive but it was a super cute personal touch and I love that they were made custom for his party! They read "Thanks for swinging by for my 1st Birthday! Love, Kye"


Party Hats and Noise Makers

It took me FOREVER to be able to find simple, PLAIN party stuff. Everywhere I looked everything had a ton of ugly designs on it and I really just wanted everything to match and have a simple, home-made look to it. I finally found some GREAT stuff at Pretty Party Place. For the noise makers I only paid $4 for 16 of them! For the party hats I paid $6 for 24. Great deal huh?
To add a little something personal to the noisemakers I hot glued ribbon around them. I think Zach thought I was a little nuts for doing this! At first I was going to just tie the ribbon but it didn't look as neat as I wanted so I whipped out the hot glue gun and went to town. It took only about 15 minutes and I think it was well worth it!

Originally I was planning on making super cute birthday hats by gluing ribbon and pom-poms around them. I wanted to make three special ones (one for Kye, one for Zach, and one for myself) and then just stick stickers on all the rest of them. Then I noticed that the hats had a slit up the back and a little hole on the top so I simply tied a knot in the bottom of little pieces of ribbon and strung it through! I used three pieces per hat and just let them hang there. They turned out so so great! I ended up making 15 of them and didn't bother to do any "special" ones because I liked these so much! And you can buy ones that look like this on Etsy for $5 or $6 PER hat! Think how much I could make if I sold these (I won't be doing that but still!).
The stickers read "Happy 1st Birthday Kye" and I used them on all of the hats as well as on the party balloons. I order them for $4 a sheet (25 per sheet) from Etsy. Special thanks to Chickabug who was SO sweet and helpful with everything! I realize now that I should have just ordered ONE sheet as I had a LOT left over! I have the extras to Mom to use to pass out at her class!