Showing posts with label toddler foods. Show all posts

Monday, October 19, 2015

Peanut Butter and Banana Muffins

Ingredients:

  • 1 cup brown sugar
  • ½ cup peanut butter
  • ½ cup carrot (finely shredded/pureed)
  • ½ cup cauliflower (finely shredded/pureed)
  • ½ cup mashed banana
  • 1 large egg white
  • 1 cup whole wheat flour
  • 1 teaspoon baking power
  • 1 teaspoon baking sode
  • ½ teaspoon salt


Directions:
  1. Preheat oven to 350, spray muffin pan with nonstick spray
  2. Combine ½ cup brown sugar, peanut butter, vegetables, banana, and egg in large bowl
  3. Mix the flour, baking powder, baking soda, and salt in a separate bowl
  4. Fold dry mix into wet mix. Don't over mix...you want it lumpy. 
  5. Add remaining ½ cup brown sugar and stir just once or twice (this gives a nice "crust" to the muffins)
  6. Cook until lightly brown 15-20 min
These also freeze well! Stick in lunch box frozen and they are thawed by lunch and you know you are giving your child some added nutrients to their special treat :)

Wednesday, September 23, 2015

Pizza Bites

These are simply AMAZING! I doubled the recipe here because, trust me, you will need to!

Ingredients

  • 2 rolls refrigerated pizza dough 
All other ingredients are a rough estimate as you can just kinda eyeball how much you need :) 
  • 4 tbl grated parmesan cheese
  • 2 tbl olive oil or melted butter
  • 1 tea garlic powder
  • 2 tea dried italian seasoning 
  • mozzarella cheese
  • pizza toppings of your choice (we use pepperoni in ours)
  • marinara or pizza sauce 


Directions
  1. Preheat to whatever package says on dough (typically it's 400)
  2. Cut dough into square shapes. I take the whole roll out of the package and then cut it, typically it makes around 20 squares
  3. Top each square with toppings and cheese, leave enough space to "close" the dough over it
  4. I just eye ball all of this and my finished products aren't super pretty. I just kinda pull up the dough to cover the toppings and then make it more into a ball to make sure all the toppings are closed in.
  5. Once they are all sealed shut place them seam side down onto a lightly sprayed pan
  6. Brush the tops with olive oil and sprinkle with the garlic powder, italian seasoning, and parmesan cheese
  7. Bake for 10-15 min, until golden brown on top. 
I dare you to have any leftovers!!!


Monday, August 24, 2015

Cauliflower Spinach Bites

Easy to freeze and great for toddlers! Perfect food for Baby-Led Weaning!

Ingredients:

  • half a head of cauliflower
  • pinch of nutmeg
  • 1/3 cup parmesan cheese
  • ½ cup cheddar cheese
  • 1 egg
  • dash of black pepper
  • spinach
  • olive oil


Directions:

  1. Preheat oven to 350
  2. Steam cauliflower until soft
  3. Add to bowl and mash with form until only small grains of cauliflower remain. Set aside to let cool.
  4. Add cheese, pinch of nutmeg, black pepper, spinach and egg to cauliflower. Mix to evenly combine
  5. Greece baking tray. Form mixture into bite size shapes and place on baking tray. Brush tops with a little olive oil. 
  6. Bake for 20 min then flip and bake another 20 minutes. You want them golden on both sides.
  7. Serve or freeze! 


Friday, August 14, 2015

Carrot Zucchini Muffins

These muffins are awesome to freeze then pack in lunches for school! They thaw by lunch time and provide a healthy boost to your child's day!

Ingredients

  • 1 cup whole wheat flour
  • 1/4 teaspoon salt
  • ½ teaspoon ground cinnamon
  • 1 teaspoon baking soda
  • 3 tablespoons melted butter
  • ½ cup maple syrup or honey
  • 1 large egg, beaten
  • 1 teaspoon vanilla extract
  • 1 cup grated zuccini
  • 1 cup grated carrot
  • ½ cup raisins (I cut mine up into small pieces)


Directions:
  1. Preheat oven to 350
  2. Coat muffin pan with nonstick cooking spray
  3. Combine flour, cinnamon, salt and baking soda in mixing bowl and whisk until combined (great job for child to do!) then set aside 
  4. In large mixing bowl stir together the butter, syrup (or honey), egg and vanilla extract
  5. Add flour mixture to wet ingredients and stir until just combined
  6. Add zucchini, carrot and raisins and stir gently just until distributed
  7. Fill each cup of the muffin pan about 3/4 full
  8. Back for 15-20 minutes or until toothpick instead in center comes out clean!
These freeze well and fit perfectly into a lunch box! They are also a healthy snack for toddlers!

Sunday, January 12, 2014

Turkey Cookies!

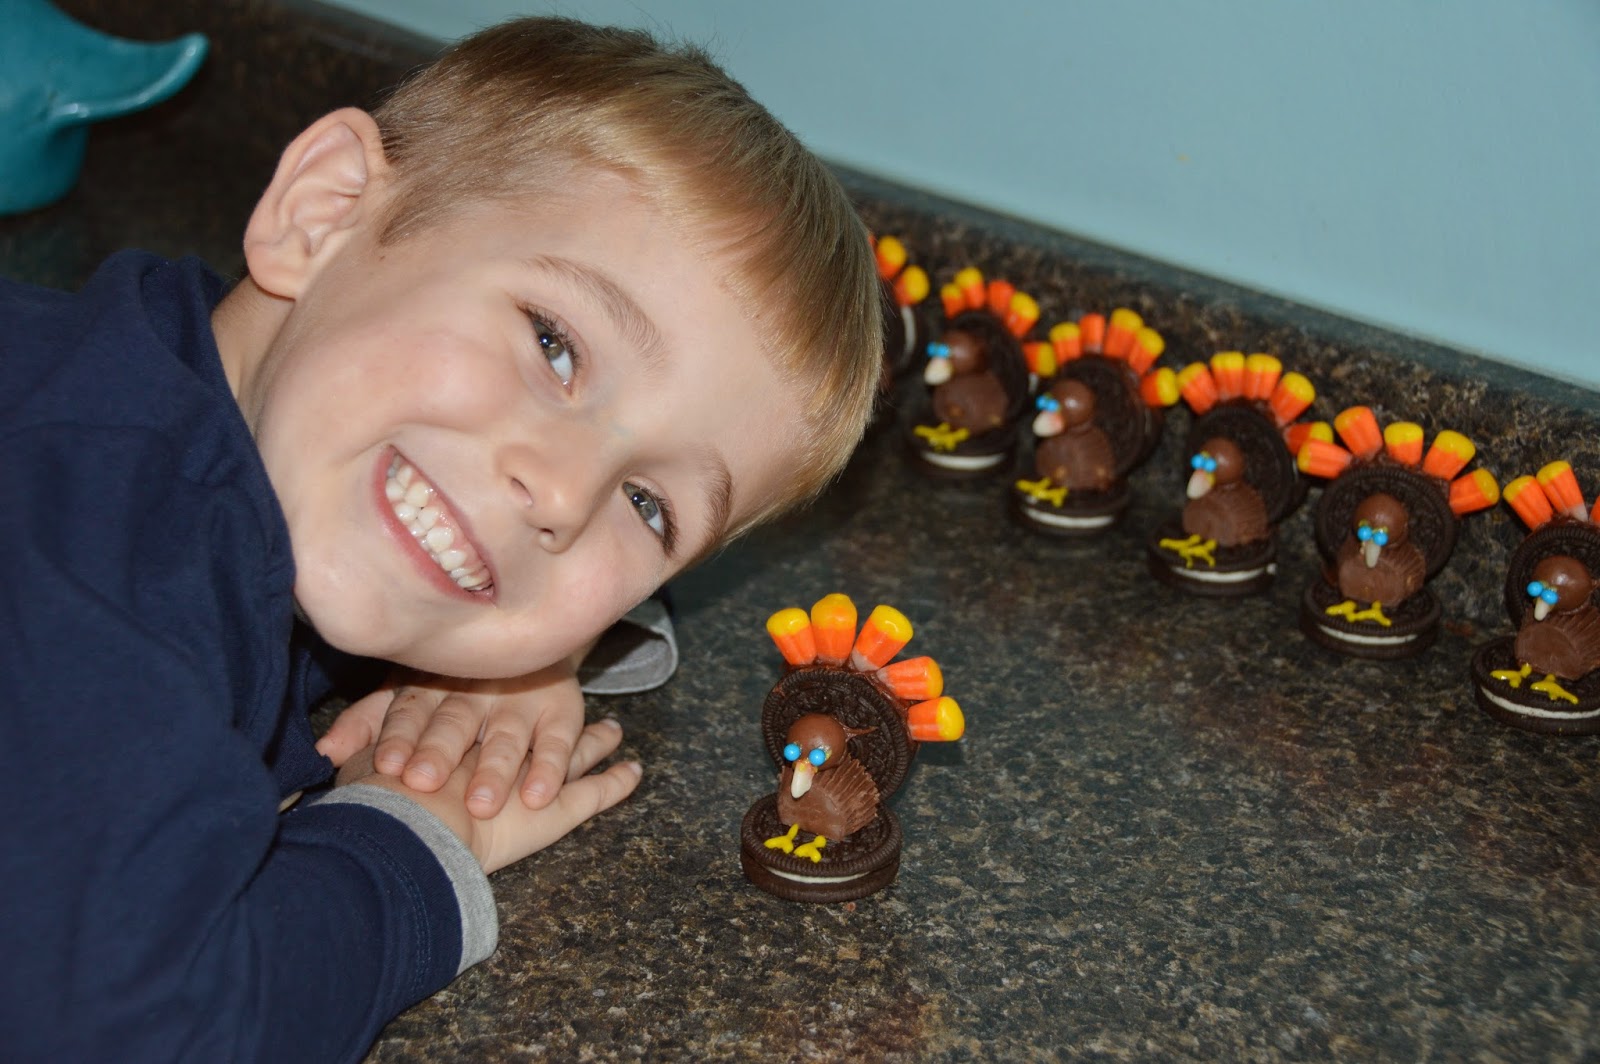
For the past couple of years we have been making Turkey Cookies for Thanksgiving! It's a WONDERFUL thing to do with a preschooler (this year Kye is four and could do them pretty much all by himself) and they look cute to display on Thanksgiving! I could NOT find my recipe for these this year and thankfully Kye remembered all of the steps for me!!! 

Ingredients:
  • Whoppers (You only need one box, I bought two but didn't use one of them)
  • One package of Double Stuffed Oreos (MUST be double stuffed!)
  • Chocolate icing (I got the squeeze tube to make it easier)
  • One bag of mini Reese's peanut butter cups
  • One bag of candy corn
  • One package of writing icing (you only need the yellow but make sure NOT to get the kind that isn't dark enough to show up...it was tricky for me to find! You also may want to use another color for the eyes)
  • I have a container of blue small sprinkles I use for the eyes, but you could easily use something else or just use the writing icing

 Directions: (They sound WAY trickier than they are! Scrolling to the bottom of this post and seeing the finished cookies may make it easier to follow along with the instructions!)

1. Put a line of the chocolate icing along one edge of the cookie. Then place 5 candy corns into the icing. 

2. Put a dab of the chocolate icing (as you can tell the icing is your "glue" for this project!) on another cookie and place the candy corn one on top of the new one. This picture shows it well...see the ones on the left side? That's how yours should look at this point!
3. Open enough Reese's to have one per cookie (ours made 19 cookies which yours should too assuming you buy the brand name Oreos!). Cut a little sliver off one end of the Reese's cup. Of course, you totally have to eat the sliver as a taste test!
 
 Taste Test!
 4. Now turn the cookies so the candy corns are facing you (see the cookies on the right side of this picture!) Put a dab of the chocolate icing on the candy corn cookie, near the bottom where the two cookies connect. Next put the "top" side of the Reese's onto the icing (the cut side should be against the other cookie)! Have it so the "side" of the Reese's is facing you!
5. Keeping the cookie in the same position, put a dab of the chocolate icing on the candy corn cookie, directly above the Reese's and place a Whopper on the icing. This is the head of the turkey! 

6. Now turn the cookie where the candy corn is facing the ceiling. Cut the white portion of enough candy corns to have one per cookie and attach it to the front of the Whopper with a little of the icing (I used some yellow gel type icing I had bought on accident just to get it used and because it dried clear so it was less noticeable). Add some eyes with icing or sprinkles, whatever you chose to do!

7. Finally draw on some legs for the turkey using the yellow icing (since I couldn't find the correct yellow icing last year ours didn't have legs and were still cute!). 

 I let Kye do pretty much 100% of this project. I only did the cutting, the chocolate icing, and the legs! 
 Enjoy!!!
I was able to find the original recipe I used! I could NOT find it when we made them but I'm glad I can now b/c I like to give credit where it is due! Here is the original recipe (and of course hers turned out 10 times cuter haha) from Our Best Bites!

Sunday, September 22, 2013

Butternut Squash Fries

Orange vegetables are a tough sell in my house and these allow me to make sure my kids get the nutrients they need!

Ingredients:

  • 1 butternut squash
  • Olive Oil
  • Salt and Pepper


Directions:

  1. Preheat oven to 400 degrees
  2. Peel and cut squash into strips
  3. Coat lightly in olive oil on a baking sheet
  4. Sprinkle with salt and pepper
  5. Cook in oven for 30-40 minutes, the longer you bake the crispier they will become
I serve them with a little side of ketchup for my 4 year old and he gobbles them down! I keep them in a tupperware and serve at lunches!

Saturday, September 21, 2013

Frozen Bananas

My kids enjoy eating bananas each morning for breakfast. Since I only grocery shop once a month I've had to get creative to make them last! Both of my kids love the frozen bananas so much that they prefer them over the fresh ones!


  • I buy roughly 20 bananas at the start of each month
  • I wait until they are starting to turn brown...like this:


  • Then I PEEL each banana and break it in half
  • Next I place each half in a Ziploc freezer gallon sized bag (and in this case I do think the brand name is worth it as it tends to cause less freezer burn than other freezer bag brands)
  • I am careful to lay each one flat in the bag


  •  After all of my bananas are in the bag I carefully lay the bag in the freezer making sure it stays laying flat so the bananas won't stick together after frozen!


  • Each morning I grab one half of banana for each child and let it thaw a little before cutting it into pieces for them! They are also EXCELLENT to add to smoothies!
  • I recommend if you're going to eat them to do so rather quickly as after a while, when they get fully thawed, they get very mushy!


Monday, May 13, 2013

Chocolate Egg Nests

This is a SUPER simple recipe. Perfect for a preschooler to help make them and a wonderful treat around Easter time and Spring!


Ingredients:

  • Chocolate Flavored Almond Bark
  • Chow Mein Noodles (Kinda tricky to locate at the store...I found them at Publix in the ethnic food aisle)
  • Jelly Beans


Directions:
  1. Use a double broiler to melt half of the chocolate (or you can melt in the microwave)
  2. Pour melted chocolate over 1/2 the bag of chow mein noodles. Stir really well to coat the noodles with the chocolate
  3. Grab handfulls and put on wax paper then place three jelly beans on each "nest"
  4. Repeat the process with the other half of the chocolate and noodles
  5. Once dry transfer to serving platter
The kids all LOVED these as well as many of the adults! Simple, inexpensive and cute!


Wednesday, May 1, 2013

DIY Fruit Snacks

This is a GREAT preschooler activity and results in a decently healthy snack too!


Ingredients:

  • 1 (3 oz) box of any flavor of Jello (Kye and I did orange bc I happened to already have a box of it in the pantry!)
  • 2 (0.25) envelopes of unflavored gelatin (this was a tad tricky to find...it was on the VERY top shelf of the Jello aisle!)
  • 1/3 cup juice (I used V8 Fushion for added nutrition) or water
  • Ice Cube Tray (I've had these since I lived in a house with no ice maker in college)


Directions:

  1. Put juice or water in a small saucepan and pour in all the gelatin packets (pouring in all the ingredients makes a great task for a small child)
  2. Have burner on medium and stir until gelatin is completely dissolved (I did let Kye do the stirring!)
  3. Pour into ice cube tray and let sit for at least 20 minutes


Result:

  • This entire recipe cost hardly anything, was simple to do, took like 5 minutes to make and ended up being a yummy treat! I did not try one but Kye LOVED them as did his little sister :) We stored them in a ziploc baggie and they lasted a couple days, after that they got REALLY hard so this is something you want to make and eat pretty quickly. We will for sure be doing this again in the future!

Original Source: http://www.sixsistersstuff.com/2012/06/homemade-jello-fruit-snacks-recipe.html

Saturday, June 16, 2012

Ice Cream in a Bag

This original recipe was taken from Family Fun Magazine!

This is a SUPER easy, quick and fun family activity. Great for preschool age as the reward is quick :)

Ingredients:
  • 2 tbl sugar
  • 1 cup half and half
  • 1/2 teaspoon vanilla extract
  • 1/2 cup salt (the bigger granules the better. Rock salt or Kosher work best...we used sea salt)
  • Ice Cubes (enough to fill a gallon-size bag about half full)
  • 1 pint-sized ziplock bag
  • 1 gallon-size ziplock bag

Directions:
  1. Combine the sugar, half and half, and vanilla extract in the pint-size bag and seal it tightly
  2. Place the salt and ice in the gallon-size bag, then place the sealed smaller bag inside as well
  3. Seal the larger bag and shake it until the mixture hardens (about 5 minutes). You can feel the smaller bag to tell when it's done
  4. Take the smaller bag out of the larger one and eat away! You can eat straight from the bag for easy clean up!

Saturday, April 21, 2012

Goldfish Carrots

The creation of Pinterest also created more pressure as a parent to have "cute" stuff for everything. When it came time for Kye's School Easter Party I searched on Pinterst for Easter snack ideas. I found this and liked that it was simple but that it also wasn't something so sweet. Kids get enough junk at school parties am I right?!?!

Supplies:
  • Large box of orange Goldfish
  • Ribbon 
  • Disposable Decorating Bags (got mine at Hobby Lobby!)
Instructions:
  1. I first cut the bags to a smaller size. They all had the logo on them so I cut right below the logo to get rid of it and make them smaller.
  2. Then I filled them with the Goldfish (great thing your toddler/preschooler can help with!)
  3. I cut the ribbon and tied it tightly to make the top of the "carrot"
Cute, Simple, Cheap and Yummy!


Sunday, October 23, 2011

Chocolate Champion Cereal Cookies

I got this recipe from The Sneaky Chef With a new baby on the way I thought it'd be smart to start freezing several different snack and food options for Kye to make my life a little easier while adjusting to having two kids! This recipe sneaks in spinach and blueberries and have less sugar and more whole grains than most kids breakfast cereals. Sounds like a winner to me!

Kye and I actually made them together and he and I BOTH licked the bowl! They were THAT good!!! Very similar to cocoa no bakes actually ;)

 Ingredients
  • 1/2 cup rolled oats
  • 1/2 cup flour blend (I have never made the blend she recommends so I just used plain old flour)
  • 3 cups whole-grain cereal flakes, such as Wheaties or Total (I used Total)
  • 1/4 cup cocoa
  • 1/2 teaspoon baking soda
  • 1 large egg
  • 1/3 cup purple puree (you can see how to make it HERE, I have some pre-made and frozen)
  • 3/4 cup sugar
  • 1 teaspoon pure vanilla extract
  • 6 tablespoons unsalted butter, softened


Directions: 

  1. Preheat oven to 350 and line a baking sheet with parchment paper (I didn't have any parchment paper and they turned out fine)
  2. Place the oats in the blow of a food processor and process on high until oats are finely ground
  3. Add cereal flakes and pulse several times until flakes resemble crumbs
  4. Transfer processed oats and cereal to a large mixing bowl and whisk in the flour blend, cocoa, and baking soda (Kye LOVED to help whisk!)
  5. In another bowl, whisk together egg, purple puree, sugar, vanilla and cooled softened butter
  6. Add the dry ingredients to the wet and mix just until combined
  7. Drop single tablespoonfuls of batter onto the baking sheets, leaving about an inch between each cookie
  8. Flatten the cookies with the back of a fork that's been sprayed with oil to keep from sticking to the batter
  9. Bake 12-15 minutes, until lightly browned around the edges
  10. Remove from pan and let cool. Store in airtight container or freeze in sealed plastic bags
These were a big hit! Kye loved helping make them, we both enjoyed the batter, and he gobbled up his helping of the finished product. While I liked the batter, I didn't so much care for the actual cookie. But as long as he likes them that's what matters! I have them stored in the freezer ready and waiting for baby :)


Friday, August 27, 2010

Cheesy Lunchbox Muffins

I found this recipe from The Sneaky Chef by: Missy Chase Lapine and it's a great way to sneak in carrot and sweet potato as well as some apple into your child's diet!

Ingredients:
  • 1 cup all-purpose flour
  • 2 teaspoons baking powder
  • 1/2 teaspoon salt
  • 1/2 teaspoon baking soda
  • 2 large eggs
  • 2 tablespoons sugar
  • 3 tablespoons vege or canola oil
  • 1/2 cup applesauce
  • 1/4 cup orange puree
  • 1/2 cup grated parmesan cheese
  • 1/2 cup diced cooked ham, turkey, salami or bologna if desired (I didn't add it since I typically spread peanut butter on his muffins for protein)
Directions
  1. Preheat oven to 375, line muffin tin with paper liners (if used, I just sprayed them)
  2. In mixing bowl, whisk together flour, baking powder, baking soda, and salt
  3. In another mixing bowl whisk together eggs, sugar, oil, applesauce, orange puree, cheese and optional meat. 
  4. Fold dry ingredients into the wet, mixing until the flour is just moistened - don't overmix
  5. Fill each muffin cup almost to the top, spooning about 1/4 cup batter into each 
  6. Bake 25-27 minutes until tops are golden brown
  7. Serve warm or wrap and store in refrigerator (for up to 3 days) or freezer (for up to 3 months)
  8. Defrost and place in lunchbox with an ice pack
     
    Result:

    Kye loves them and I think they will be SO useful for when Kye has a little lunchbox to take to school. I like that I'll be able to offer him variety other than just pbj and that he'll be eating something healthy without even realizing it!

    Thursday, August 26, 2010

    Purple Puree

    This is used for all recipes that call for "purple puree" it is from the cookbook The Sneaky Chef by: Missy Chase Lapine.

    Ingredients:
    • 3 cups raw baby spinach leaves
    • 1 1/2 cups blueberries
    • 1/2 teaspoon lemon juice
    • 1-2 tablespoons water
    Directions:
    1. Fill bowl of food processor with spinach, blueberries, lemon juice and 1 tablespoon of water
    2. Puree on high until as smooth as possible. If needed, use another tablespoon of water to smooth-out puree
    3. This recipe makes about 2 cups of puree; double if you want to store more. It will keep in the refrigerator for up to three days or you can freeze 1/4 cup portions sealed in plastic bags (this is what I did).  

     Results:

    This is the grossed looking puree of all! While it's gross looking, it was the easiest to prepare and I think it's one of the healthiest ones since it has both blueberries and spinach!